Скачать с ютуб How To Make The Ultimate Desktop Electric Foundry в хорошем качестве
How To Make The Ultimate Desktop Electric Foundry
1 год назад
Скачать бесплатно How To Make The Ultimate Desktop Electric Foundry в качестве 4к (2к / 1080p)
У нас вы можете посмотреть бесплатно How To Make The Ultimate Desktop Electric Foundry или скачать в максимальном доступном качестве, которое было загружено на ютуб. Для скачивания выберите вариант из формы ниже:
Загрузить музыку / рингтон How To Make The Ultimate Desktop Electric Foundry в формате MP3:
Если кнопки скачивания не
загрузились
НАЖМИТЕ ЗДЕСЬ или обновите страницу
Если возникают проблемы со скачиванием, пожалуйста напишите в поддержку по адресу внизу
страницы.
Спасибо за использование сервиса savevideohd.ru
How To Make The Ultimate Desktop Electric Foundry
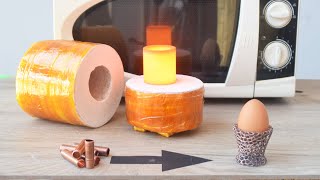
Today, we'll be upgrading the classic paint can forge into an all-electric 2000-degree desktop kiln, capable of melting aluminum, copper, and so much more! Parts list (total cost is roughly $150): 1. Inkbird PID controller with SSR and heatsink: https://www.amazon.com/Inkbird-Temper... 2. K-type thermocouple rated for over 1200C: https://www.amazon.com/Yeeco-Thermoco... 3. Gallon-size metal paint can: https://www.homedepot.com/p/BEHR-1-ga... 4. Kastolite-30 castable refractory (5-pounds): https://hightemptools.com/products/ka... 5. 1"x12"x24" ceramic blanket (aka, Inswool or Kaowool): https://hightemptools.com/products/in... 6. Ceramic terminal block: https://www.amazon.com/Ceramics-Termi... 7. Carvable foam ("Desert Dry Fom"): https://www.walmart.com/ip/FloraCraft... 8. 3000W kanthal heating element: https://www.amazon.com/uxcell-Heating... 9. Other assorted building materials (wood, screws, and wire) can be found in stores like Home Depot, Lowes, and even Walmart Want to support LabCoatz? Then feel free to join my Patreon page! It literally costs less that a cup of coffee: / labcoatz Don't want to pay monthly and just want to be a one-time supporter? Then follow this link to donate: https://www.paypal.com/paypalme/labcoatz 0:00 Intro 0:27 Preparing the paint can 1:18 Insulation discussion 1:44 Carving the foam insert 2:07 Preparing the ceramic blanket 2:31 Insulating the body 3:34 Assembling the base and PID controller 4:18 Finishing the body 4:38 Adding the heating element 5:16 Bakeout 5:30 Firing it up! 5:58 What next?
Comments