Скачать с ютуб Antique Rusty Cleaver Restoration [Satisfying restoration] в хорошем качестве
Antique Rusty Cleaver Restoration [Satisfying restoration]
1 год назад
Скачать бесплатно Antique Rusty Cleaver Restoration [Satisfying restoration] в качестве 4к (2к / 1080p)
У нас вы можете посмотреть бесплатно Antique Rusty Cleaver Restoration [Satisfying restoration] или скачать в максимальном доступном качестве, которое было загружено на ютуб. Для скачивания выберите вариант из формы ниже:
Загрузить музыку / рингтон Antique Rusty Cleaver Restoration [Satisfying restoration] в формате MP3:
Если кнопки скачивания не
загрузились
НАЖМИТЕ ЗДЕСЬ или обновите страницу
Если возникают проблемы со скачиванием, пожалуйста напишите в поддержку по адресу внизу
страницы.
Спасибо за использование сервиса savevideohd.ru
Antique Rusty Cleaver Restoration [Satisfying restoration]
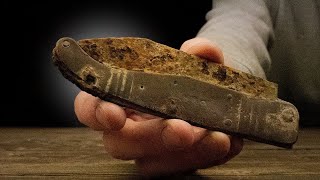
Restoration of an old rusty antique cleaver. Please subscribe if you love satisfying restorations! I got this meat cleaver for under $20 at a local antique shop. I did not know how special this piece was until I began to restore it. It turns out this rusty cleaver was made in Greenfield Massachusetts somewhere between 1890 and 1950. The steel was incredibly hard, I was impressed with the quality. I began to restore the tool by removing the old wood handle and pins. The handle was brittle and easy to remove, but the pins were quite seized. I cut them flush using a Dremel cut-off wheel, then beat them out with a Starrett punch. Once the cleaver's handle was removed, I needed to clean the blade and remove the rust. I started with a simple wash with dish soap and a gentle brass brush, then soaked it in evaporust rust removing solution. After a few days, most of the rust had dissolved, and and the antique cleaver was ready to be restored. From there, a decided to smooth out all of the sharp edges, and mirror polish the entire perimeter. This requires a ton of sanding and alot of elbow grease. This was the hardest steel I have ever attempted to polish. After several hours of work prepping the blade, it was time to move on to restoring the handle. I chose maple wood, as it is closed grain and well-suited for knife handles and kitchen items that are exposed to food and bacteria. I cut the handle scales by hand, then used a belt and disk sander to help shape the pieces of wood. I replaced the original steel pins with brass tubing. Instead of peening the pins like the originals, I knew I was going to use epoxy to fasten the handle so tubing was sufficient I then fastened the handle to the blade using two part epoxy. Tung oil was used to finish the handle as it produces a beautiful finish, and is also food safe. The final step was to sharpen the blade. A 25-30 degree angle is sufficient for sharpening a cleaver blade as it is intended for rough work and not paper-thin cuts. I used a shapton 320 and 1000 grit whetstone. If you love restorations, please check out the rest of my videos! 00:00 Restoration begins 01:16 cleaning 01:52 rust removal 02:32 grinding and sanding edges 05:22 mirror polishing 07:21 cold bluing 8:31 starting the handle 10:17 making new pins 11:10 drilling 11:32 mixing two part epoxy 12:57 shaping handle 14:00 final sanding by hand 14:20 finishing with tung oil 14:46 sharpening blade with stone
Comments